Learn how to make delicious Sushi Rolls (Hosomaki) at home with step-by-step instructions and a tutorial video. To get started, you just need a few ingredients like tuna, cucumber, nori, and Japanese short grain rice.
Sushi Rolls (Hosomaki)
INGREDIENTS
Sushi Rice:
- 2 rice cooker cups uncooked Japanese short grain rice (2 cups = 360 ml)
- 2 inch kombu (dried kelp) (2" = 5 cm) (optional – traditionally, for sushi we cook rice with kombu)
- 4 Tbsp rice vinegar
- 2 Tbsp sugar
- 1 tsp salt (kosher or sea salt; use half if using table salt)
Fillings:
- 1 Persian/Japanese cucumber (yield 8 rolls)
- 6.8 oz sashimi-grade tuna (6.8 oz = 194 g) (yield 12 rolls)
- 1 box Natto (fermented soybean) (yield 2 rolls)
Tezu (vinegared hand-dipping water):
- ¼ cup water
- 1 Tbsp rice vinegar
Everything Else:
- 5 sheets nori (seaweed)
- Soy sauce
- Wasabi (optional)
- Sushi ginger (optional) (See Notes for homemade recipe)
INSTRUCTIONS
- Gather all the ingredients.
- Prepare Sushi Rice. To follow a detailed step-by-step instruction, please click here. Cover the sushi rice and the completed rolls with a damp cloth/plastic wrap at all times to prevent from drying.
- Cut both ends of the cucumber. Then cut in half lengthwise and cut again in half so you now have 4 strips. Remove the seeds with knife and cut in half lengthwise again. You should end up with 8 cucumber strips.
- Cut the tuna into ¼- ½” slices and then cut into ¼- ½” thick long strips.
- Take out the natto from the container and season with soy sauce or seasoning that came with the package. Mix everything up until it’s slimy and bubbly.
- Make vinegared hand-dipping water (Tezu) by combining ¼ cup water and 1 Tbsp rice vinegar in a small bowl. Applying this water to your hands prevents rice from sticking to your hands.
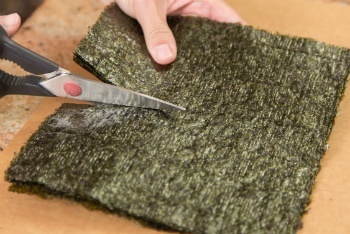
- Cut nori in half. Even though it may look it, Nori sheets are not perfect square; therefore cut the longer side of rectangular in half. Also, nori gets stale easily, so store unused nori in an air-tight bag and take out only as much as you need.

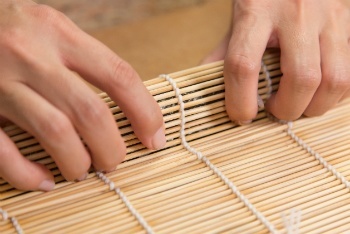
- Place the sushi mat on a working surface. The bamboo strings should go sideways so you can roll them up. And put the nori half sheet on the bamboo mat, with one of nori’s long side close to the back edge of the mat. Leave about 3-4 slats visible on the side nearest to you. The shiny side of nori should face DOWN.
- Moisten your hand before you touch sushi rice.
- Scoop a scant ½ cup of sushi rice into your hand. My trick is to use a ½ cup measuring cup. That way the amount of rice for each roll is the same and the rolls will be equal size. Make sure to wet the measuring cup so the rice wont’ stick. I know, this is not a “proper” way, but until you can grab a perfect amount of rice each time, this trick will do!
- Place the sushi rice on the left center of nori. Now spread the rice across the nori, leaving a 1” space along the top edge of the nori. Use your right hand to spread the rice toward the right and use your left fingers to keep the rice away from the 1” space on the top of the nori.
- Spread the rice evenly with both fingers, still keeping the 1” space on the top. Wet your fingers in dipping water if rice starts to stick to your fingers.
- Place the filling (tuna, cucumber, natto) at the middle of rice. If your tuna or cucumber is a bit too short, add extra pieces on the end. Hold the filling down using your fingers.
- With one swift movement, roll the sushi over the filling and land right where the edge of the rice is (see you still see the 1”nori space after rolling).
- Don’t move the sushi mat yet and gently shape and tighten the roll with your fingers from outside of the mat. Shape the sushi roll into square (or round). Then finally lift the sushi mat and rotate the roll once to seal the edge of nori. Again gently squeeze and tighten the roll with your fingers.

- To cut a sushi roll, wet your knife with a damp towel and cut the roll in half first. You should “push then pull” the knife while cutting through the sushi. Wet the knife again and cut each half roll into 3 pieces. Serve with soy sauce, wasabi, and pickled ginger.


Комментариев нет:
Отправить комментарий